
Notes Upon Completion
Drafting – I hand-drafted this corset using my measurements and the pattern on P. 44 & 45 of Corsets: Historical Patterns & Techniques (Salen:2008.) When doing so, remember to mark the waistline and underbust lines where these fall on your body. I didn’t, and was slightly at a loss when counting stitches for the placement of the bust tapering. Transfer the waist line marking to all pieces, preferably both the front and back edges of each piece, in the seam allowances, as a guide for getting them aligned when basting. Since my waist is actually a tilted ellipse, higher in the back than the front, I will admit I haven’t figured out how to address this in paper drafting. (Note: Jill Salen wrote to let me know to move on into the modern world by draping. lol.) If you read my previous entries regarding this build, you might recall that initially I was going to add a sixth piece to give me a larger fit. When it came time to put pencil to paper, I decided on creating the pattern exactly as presented in the book, instead. This necessitated adding substantial inches to the hip area to fit my derriere, but I’m so glad I stuck as close as possible to the pattern. Doing so resulted in a garment that finally gave me the shape I’d been chasing for years, and also allowed me to embrace my own, natural curves. It was my measurements plus sticking to the pattern that gave me what I wanted. I did not set out to create this particular hippy shape. The goal was to build as close as possible to the historical pattern, while making something that fit my body. I actually surprised myself.
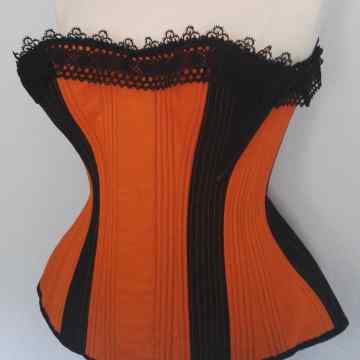
Construction – During assembly, all pieces folded nicely together in pinning and basting except the bust curve. To accommodate my DD bust, I’d added a significant curve to the inner edge of Piece 2. I tried to distribute the curve across both Pieces 1 and 2, but they didn’t ease very nicely into each other, creating a weird, jutting bump in the bust area, and I ended up lopping 1 full inch of curve (tapered out) from off of Piece 2 before I molded it to back to Piece 1. I thought this would make the bust extremely small, but it ended up creating the “negative ease” I’ve read about that’s required to fit shape-wear. The result made the corset substantially more supportive and comfortable. Probably the most un-professional way of creating it, but I’m just going to file it under “fitting”.
I use heavy cording which I purchase by the spoolful at a local thrift store. It is uniform in width, 100% cotton and comes in black at a very low cost. I used a lot of cording, probably 1/2 – 2/3’s of the spool in just this corset. I use black for darker and colored corsets, and white or ivory for lighter in color work. I hate seeing cording or bones peeping through the weave of a fabric. This corset is 3 layers: a quilting cotton outer layer, a coutil mid-layer and a twill lining. The cord is tucked in between the coutil and the twill layers. I didn’t lose very much fabric in cording. In the test run, I detected 0 loss, and I’d been expecting about a 1 inch loss to each piece. In the end, I noted that there was about a 1/4″ loss to each piece, which resulted in a waistline that was a bit too small. I’d cut for 30″, and ended at just over 28″. I really worked on a piecing accuracy of 1-2 mm, but honestly, in corsetry, even that proves too much, over the course of so many pieces. I’m improving with each one I make, but it can be nerve-racking.
I believe I used cording very close to the original because my Piece 1 was nearly spot-on upon completion, even with the little busk casing snafu. (I’d measured the busk cover very carefully, even accommodating the 2.5 mm depth of the wooden busk, itself, and initially was very happy with the placement, but after I ran cording up against it, one side was uneven for a reason I still can’t work out, and I ended up needing to run one cord over the edge of the busk casing to make everything even on the outside.)
After Piece 1, the cording placement changed because of the size grading I had to do. I used the pictures in the book as a guide, and gave every effort to keep as close to original as possible. I packed the cording as best I could into the waist, and the channels naturally taper out, top and bottom. I especially like the look of heavy cording. I machined the cording rather than hand-pulled. I have an extra-long zipper foot and use a metal chop stick to pre-press the tension in as it goes under the long foot. Although I did try the hand-pulled cording, as described in the text, I was unsuccessful. Any time I managed to struggle a cord through a channel, it never looked tidy, but most often, the thread broke before I’d pulled to the opposite end, and when I switched to heavy linen thread, I simply lost the cord in the center before I reached the other side. This might be alleviated by creating slightly wider channels, but I wasn’t willing to give up the tightly corded look.
There was one area that creating channels that were not uniform to the other, even though I fought for it. The cording is run right up to the seam allowances, which meant I used the long zipper foot for seams, as well. Then, I had a ton of seam allowance left, which I trimmed. But still the seam allowance would run into the next cord. In the end, I used the seam allowance, itself, as the first cord for each piece. This created a channel that was at least 1mm larger than the actual corded channels, but if one studies the pictures, I believe the original corset might have used the seam allowance, as well, because it looks like each first channel butted against a seam is ever-so-slightly wider. It was the only solution I arrived at, as the cord against the seam allowance was an unsightly impossibility. I accepted it with joy, as it saved a lot of time and frustration.
Because I machine cord, it left a quandary of how to finish the last piece. I pre-set my grommets and did all the cording for piece 5, which meant I had to attach them, not as a sandwich, but with facing right sides together, leaving a raw seam on the interior. I knew I had to cover it, but couldn’t top-stitch, due to the cording. In the end, I figured out that I needed to hand-tack the twill tape over the edge. This area is one thing I’d like to see in person: how was this thing finally closed?

The Busk – My busk was made for me out of a mid-west hardwood by my step-father. In 2007 -08, there weren’t really any wooden busks available, and I asked him to make a prototype. He made one and sent it to me, and we were set to make a small production, but he passed away shortly, before that could happen. I carried that prototype around to make a pair of stays, but have used it here, instead. The busk has holes in the top, to tie the ribbon through, to keep the busk in place, or from riding up during wear. I think they were most often placed in the bottom, but I want to say I’ve seen both. The busk casing is made from coutil, and I inserted two black eyelets to pull the ribbon through and keep the attachment temporary.

Trim – I had such a good time hunting for the lace! I found the wheel-shaped lace, as close to original as possible, but it doesn’t have the little scalloped edge that the lace in the pictures has. When I really, really looked, I figured, maybe the original had a smaller, black lace run over the top, or behind the the larger one. So, I found even more and fancier lace, and used it. I love the result. Also, when stitching it on, it puckers over the bust, but they’d solved that, too, by almost invisibly hand-tacking it down to the first, and possibly the last, or outer, cording channels, in the ditch. I’m pretty sure that’s what I see in the pictures, and if not, it’s brilliant, so do it!
Imperfections – There are a few. I’m 2mm off in some piecing and channeling areas. I don’t care for my 100% hand-stitched lower binding. I machined the top binding, then hand-tacked, and it looks much neater, but no one will ever see because now it’s covered with two layers of black lace.

Weird Surprise – I don’t advocate for reversible corsets at all, they are shaped for a reason, and they conform, in one direction, wrapped around the body. While I did strive for an intentionally neat interior, I was not aiming to make anything reversible. Yet, when I wrapped the corset around the dress form, I could see that I might actually be able to reverse-lace to the black lining. It’s just as handsome on the inside, so I very possibly ended up with two corsets for the work of four! er, I mean, one!
Conclusion – Over all, this corset with it’s contrasting channels and cording was a little more challenging than it initially appears. It’s not difficult, per se, but it is very fussy. Focusing, it took me 6 months, start to finish, working around my job, a death (in someone else’s family), a re-do of the sewing space from floor boards to wall paint, holidays, 2 new jobs, 2 job losses, catching cold 3 times, 100+ hours of Brian Jonestown Massacre, live, and a world pandemic apocalypse.


Leave a comment